How To Sharpen Your Drill Bits
There's nothing more frustrating than when you're working on a project and you suddenly notice that your drill bit is dull. If your drill bits are not sharp then they're no good to you. They can slip, break, overheat and this has the potential to ruin your entire project. You may have been working on something for hours, days or maybe even weeks so you definitely don't want all of your hard work, time and money to go to waste.
Drill Doctor was designed to directly remedy this problem. Its patented technology restores dull drill bits back to factory sharpness in just seconds. The sharpening process replicates the same dual motion that factories use to manufacture new drill bits. This is why we say that the Drill Doctor can achieve factory sharpness every time and the precision in which it does it means that drill bits can be sharpened over and over again.

You can use the Drill Doctor to sharpen virtually every drill bit that you could possibly need including high-speed steel, TiN coated, cobalt and even masonry bits. Check out our anatomy of a drill bit page to learn more about these and what materials they are best used for drilling.
But how exactly do you use the Drill Doctor to sharpen your drill bits? It is a very easy process. You only need to follow these simple steps to sharpen any drill bit.
Preparation
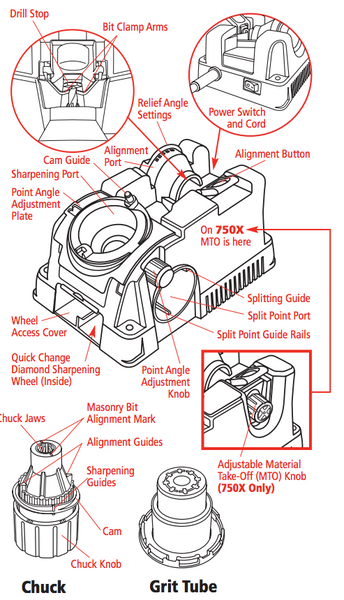
Before you start, make sure that you are well prepared. Familiarise yourself with the Drill Doctor by referring to the user guide. The key parts of the Drill Doctor are the chuck, the alignment port, the sharpening port and the splitting port. You will need to know where these are.
You should ensure that the point angle is set correctly. Set it to a standard 118-degree or a flatter 135-degree angle. Most bits have a 118-degree angle.
Additionally, if you have a 750X, you will need to adjust the material take-off knob before you begin. To set, turn the knob counter-clockwise until it stops. Then turn clockwise three marks on the knob. This is a good place to start for most bits.
Now you're ready to begin.
Alignment
- Insert the bit into the chuck jaws and close the jaws to the point where the bit slides in and out.
- Press the alignment button down and hold it.
- Insert the chuck and match the alignment guide on the chuck with the 118-degree notch on the tube.
- Release the alignment button and make sure the bit is touching the drill stop.
- Make sure the clamp arms are in the bit's narrowest spot. If they aren't, turn the bit to the point until it is. This is important because this setting determines the angle at which your bit is sharpened.
- Then hold onto the chuck and tighten the chuck knob.
- Press the alignment button and remove the chucked drill bit.
- Tighten the chuck once more so that the drill bit won't move when you sharpen it.
Sharpen
- Insert the chuck and align either white line with the cam guide.
- Rotate the chuck one-half turn in a clockwise motion.
- Turn white line to white line an even number of times (about 6 for a 1/4" bit and 16-20 for a 3/8" bit).
- Remove the chuck and inspect the bit to check the sharpness.
During this process, listen carefully to the sound your Drill Doctor makes. You should direct light pressure into the sharpening hole not down. Always make sure that the chuck rests firmly against the cam guide as you turn the chuck. This causes the sharpening port to rock back and forth and shapes your bit for the best cutting.
For small bits, use very light pressure and use an even number of turns. The bit should only briefly contact the wheel. Large bits will require more white line to white line rotations. 1/2" bits and larger will need a minimum of 20 half turns. A 3/4" bit may require up to 40 half turns to sharpen.
Optional Step: Split the Point
- Do not remove the bit from the chuck after sharpening.
- Align the white line on the chuck with the mark on the splitting port. This will line up the alignment guide with the guide rails.
- Press the chuck slowly and firmly into the splitting port until the chuck stops.
- Rotate one-half turn and repeat.

And it's as easy as that. You never have to replace your drill bits again. With a Drill Doctor, you essentially have a lifetime supply. It pays for itself in no time!
If you regularly sharpen larger bits, it may be a good idea to purchase the coarser 100 grit diamond sharpening wheel for your Drill Doctor to sharpen even faster.
Drill Doctor UK is the UK authorised distributor of all Drill Doctor models and accessories, providing 3-year warranty, repairs and spares. You won't find cheaper prices for the 360X, 500X or the 750X anywhere else in the UK. If you are a professional who uses drill bits every day or even if you only drill when you’re doing DIY, buy a Drill Doctor and make life easier for yourself.
